Smart Ping is a platform that allows businesses to send promotional and transactional messages to their customers via SMS, voice calls, and other channels. To keep spam away and ensure transparency in messaging, the government in India has mandated businesses register with Distributed Ledger Technology (DLT).
1. Visit www.smartping.live URL to Login/Register yourself as Entity/Telemarketer

2. Click on Login/Signup button to Login or register yourself as Entity/Telemarketer
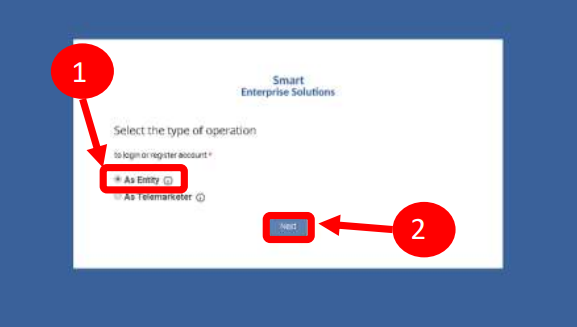
1. To register yourself as an Entity on the portal, select the “As Entity” option in the Type of Operation. A Business unit, Company, Legally Recognised Institution or Person engaged in business or service who would like to send communications to customers or intended recipients through SMS or voice call through a registered telemarketer.
Note: A Business unit, Company, Legally Recognised Institution or Person engaged in business or service who would like to send communications to customers or intended recipients through SMS or voice call through a registered telemarketer.
2.Click the Next button for further steps towards registration.
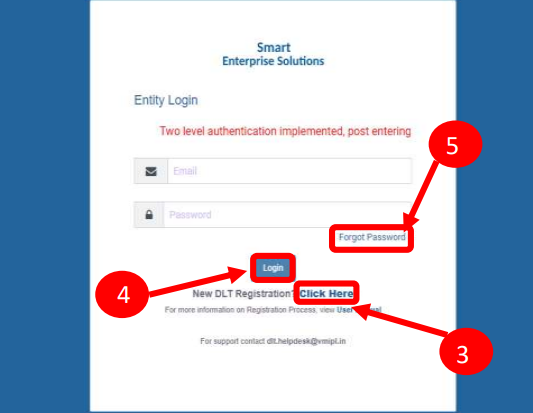 REGISTRATION - ENTITY LOGIN /SIGNUP PAGE
3. Click on Click Here Button to start a new registration process.
4. Put in Email ID & Password and Click Login Button to access the panel, if you already registered Entity
5.Click Forgot password? in case you forgot the password. (The New Password will be sent to your Registered Email ID.)

6. Select the Location of Company. Choose Indian if
your company is Indian Origin
7.Choose Overseas if your company is of Overseas origin.
8. After selecting the company’s location click Next Button for further steps.
1. Select the Registration type. Choose New Registration if you are registering for the first time.
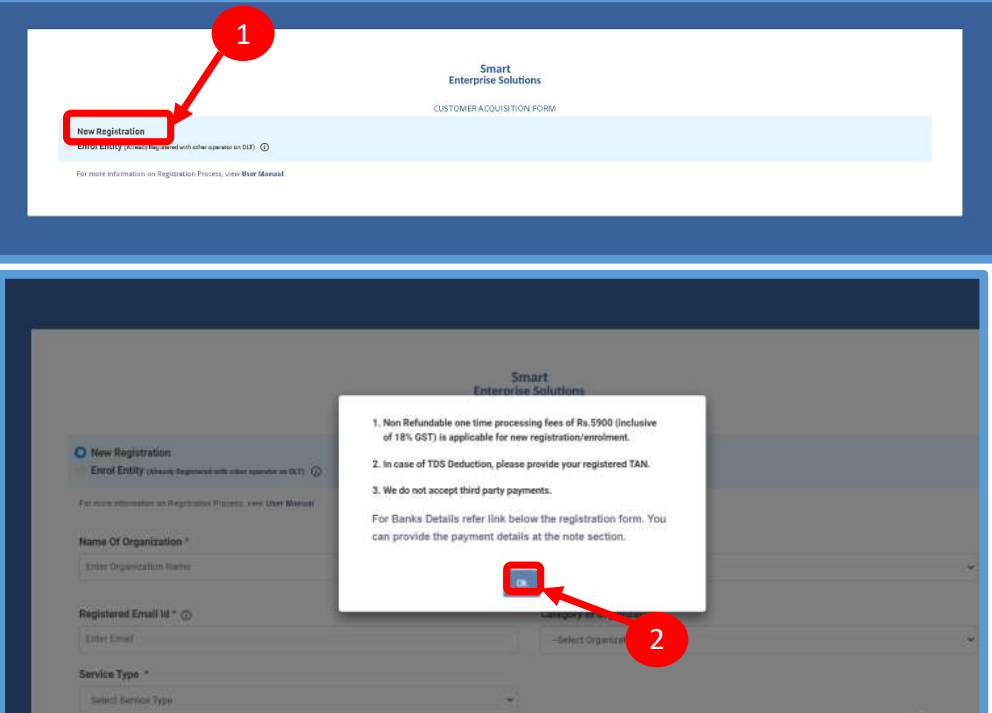
2. After Selecting New Registration, confirm the Payment terms by clicking the Ok button. Duly fill the customer acquisition form and submit.
3. You will receive an OTP on your registered Mobile number and Email ID to verify mobile number. Enter OTP and click the Submit button.

4. If in case OTP not received, click Resend button
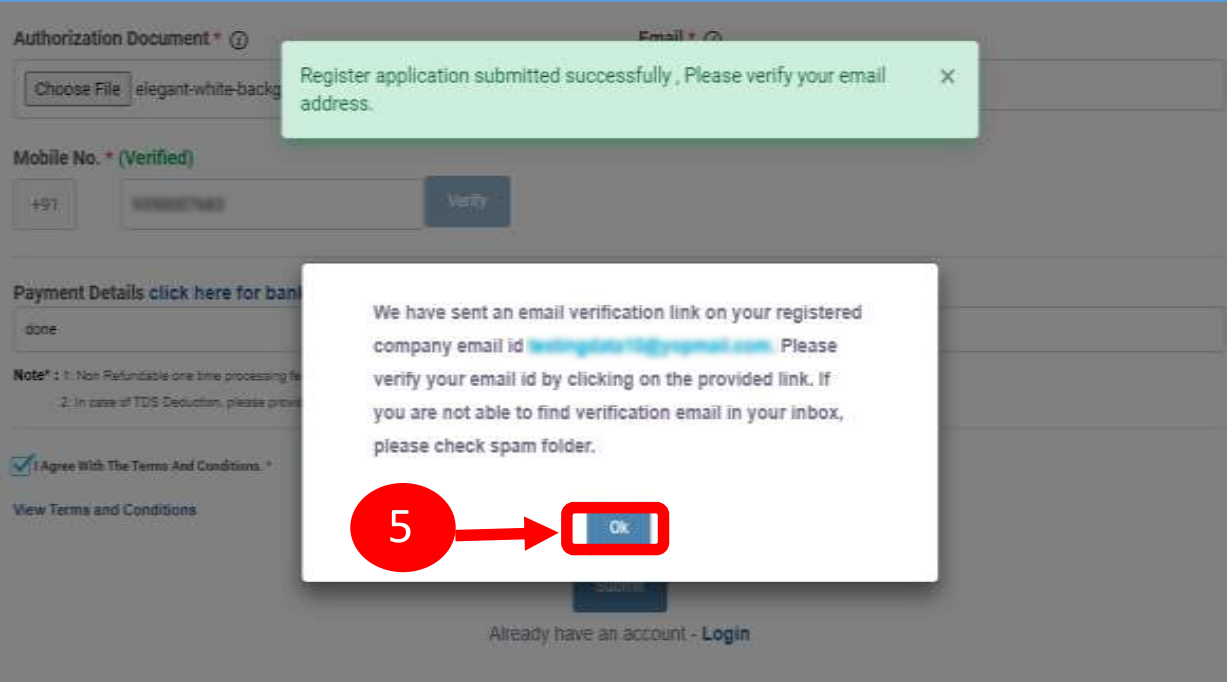
5. After forms submission, a verification link will be sent to your registered email Id. Click the OK button once you read the message and validate your mail by clicking the verification link received on your registered email id. Please check your email inbox as well as spam folder for the verification link.
6. On successful email id verification you will receive a message confirming the submission of your application. Once Operator approves your application, you will receive login credentials on your registered email id
7. Use the login credentials sent by the operator to access the Entity portal and Click Submit.
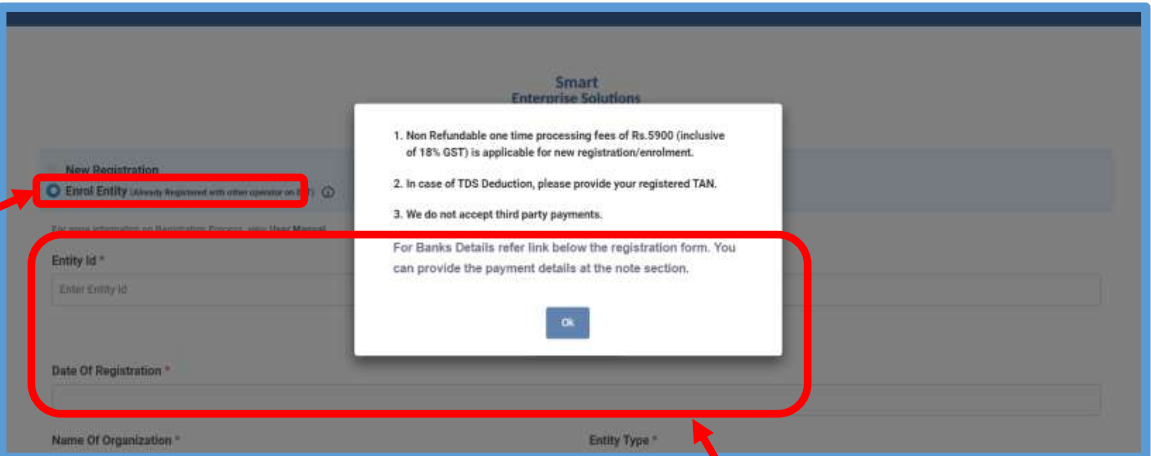
1. Choose Enrol Entity if your company is already registered on a different operator and Fill the form. Entity already registered with other operator on DLT can enroll by providing Entity ID (DLT Registration Number)
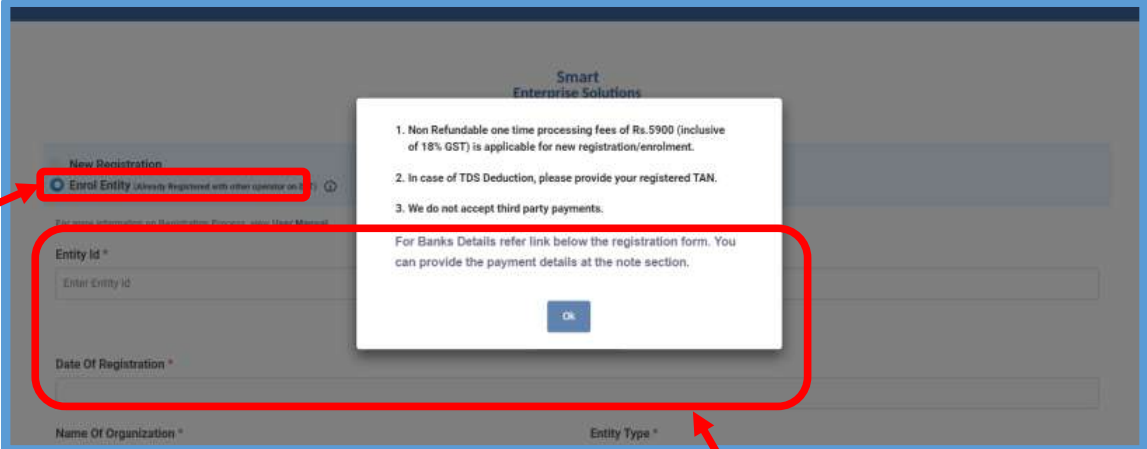
2. After selecting Enrol Entity the form will scroll down which needs to be filled by the user for registering
3. Type in the already registered Entity Id and click the View details button. Duly Fill the form and click Submit.

4. You will receive a One Time Password (OTP) on your registered Mobile number and Email ID to verify mobile number. Enter OTP and click the Submit button.
5. If in case OTP not received, click Resend button.
6. After form submission, a verification link will be
sent to your registered email Id.
Click OK button once you read the message and
validate your mail by clicking the verification link
received on your registered email id.
Please check your email inbox as well as spam
folder for the verification link.
7. After email verification Click OK button to
confirm. Once Operator approves your
application,you willreceive login credentialson
your registeredemail id.
8. If you are already registered as Entity.
Put your User ID (Email ID) & Password and
Click the Login button to access the panel.

9. You have to complete the Two Way
Authentication Process by submitting the
OTP received on option chosen.
1. Click Assets for Verification on the left panel to
Verify all the unverified Headers of the Entity.
2.Click on unverified headers the user can verify
the headers by single & Bulk selection.
3. Click on surrender button to surrender the header.
Surrender Header Confirmation pop Up will appear
enter OTP & Remarks to surrender the same.

1. Click Telemarketer Request on the left panel to
register Telemarketer with Entity
2. Enter Telemarketer ID.
3. Click on view details
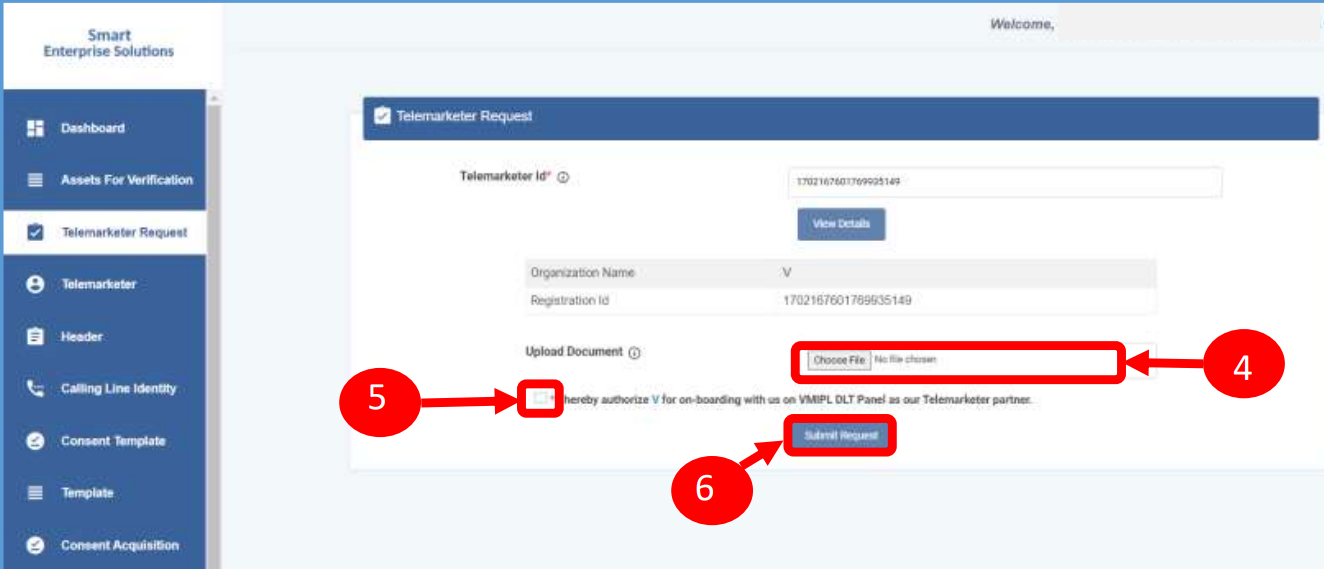
4. Upload theAuthorized document
5. Check the Box authorizing the Telemarketer to
be associated for doing commercial
communication activities.
6. Clickon Submit Request and wait for
Telemarketer’s approval
7. Once the request is submitted it can be
viewed in the TM Approval Pending section.
8. Once the request is approved by the
Telemarketer it can be viewed in the
Approved Telemarketers section

9. Entity Approval Pending Section Click
on the Entity Approval Pending Tab the
tab has pending Telemarketers that are
waiting for approval from the Entity.
As per the action taken it will move into
Approved or Rejected tab.
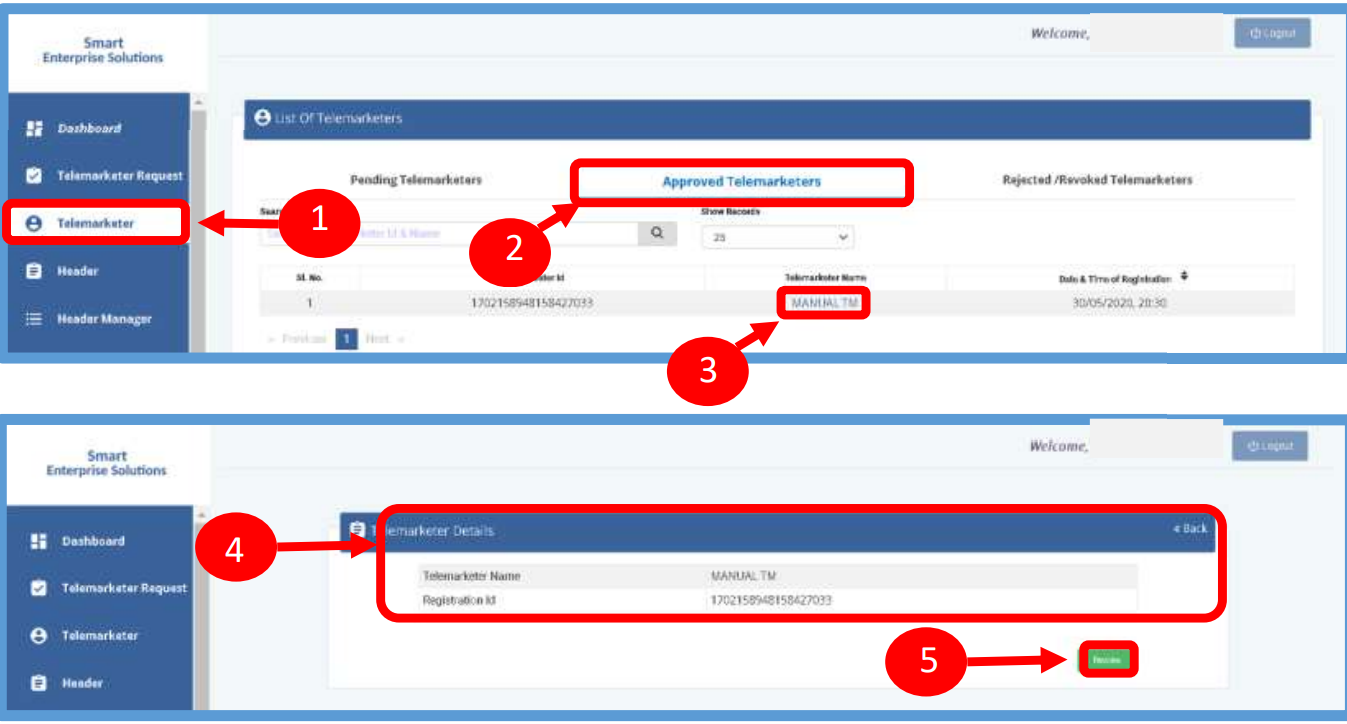
1. To terminate a business relationship between an Entity
and a Telemarketer Revoke function is available on the
Entity Panel.
2. Select the Telemarketer tab from the side
bar. Go to the Approved Telemarketer section
3. Click on the Name of the Telemarketer with
whom you want to terminate the relationship.
4. Telemarketer details will be displayed and
there will be Revoke button to terminate the
business relationship.
5. Click on the Revoke button
6. On clicking the Revoke button a page
opens, provide the relevant Remarks for
revocation.
7. Press Revoke button after providing
remarks.
8. A pop-up message will be displayed to
confirm the Revocation process. Press
Yes to confirm the action or press cancel
to stop the action
9. The business relationship between the
Telemarketer and the Entity will be terminated
and the entry will be visible on the
Rejected/Revoked Telemarketers section.
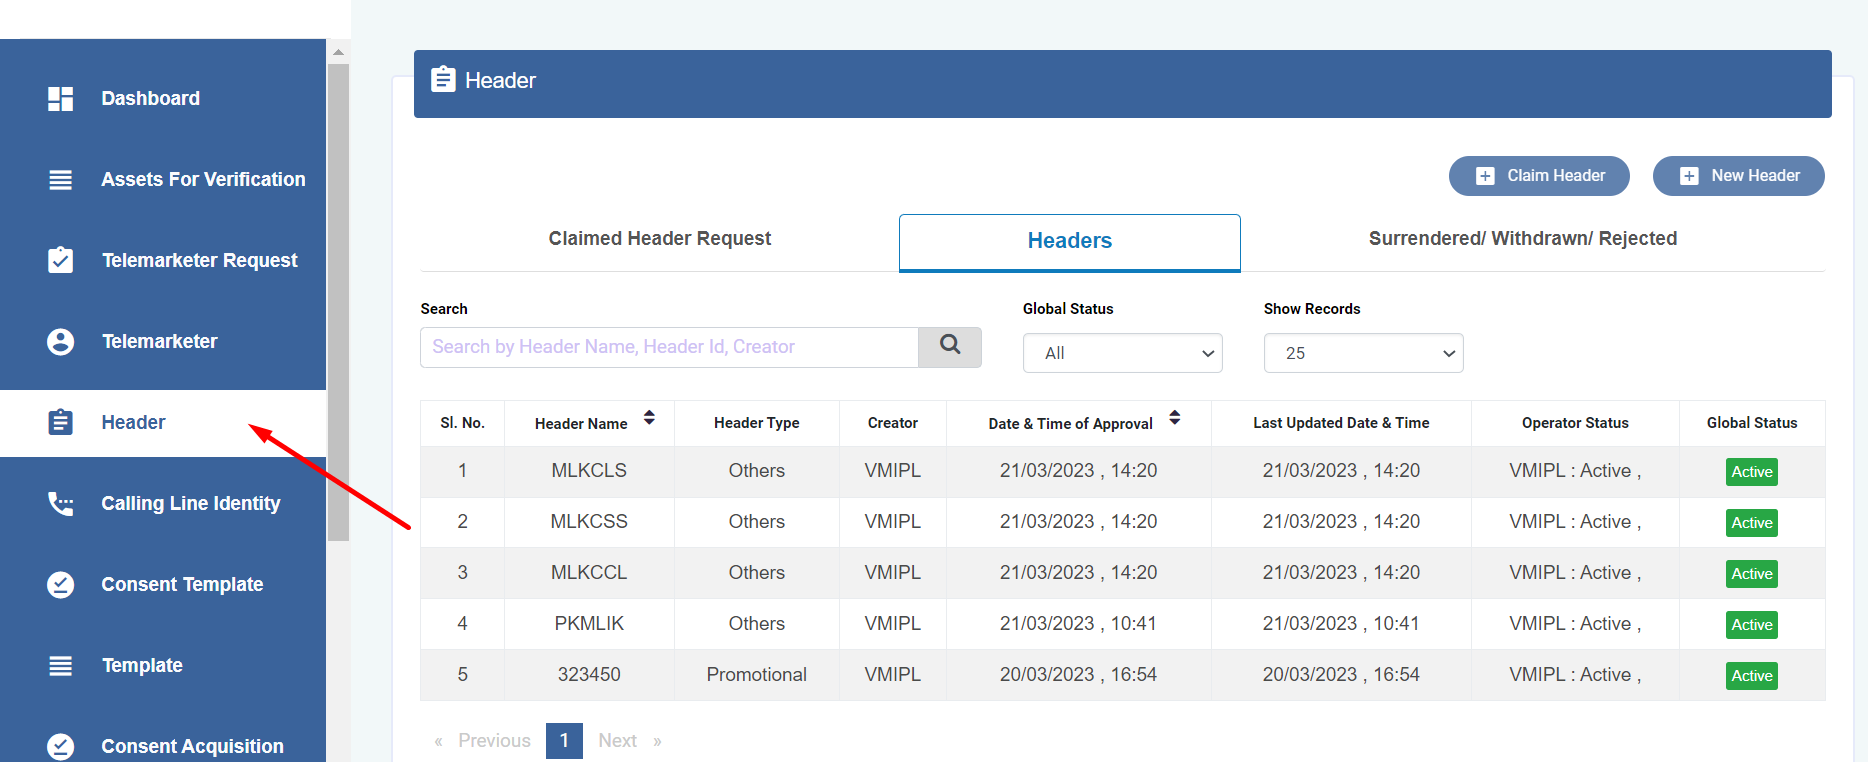
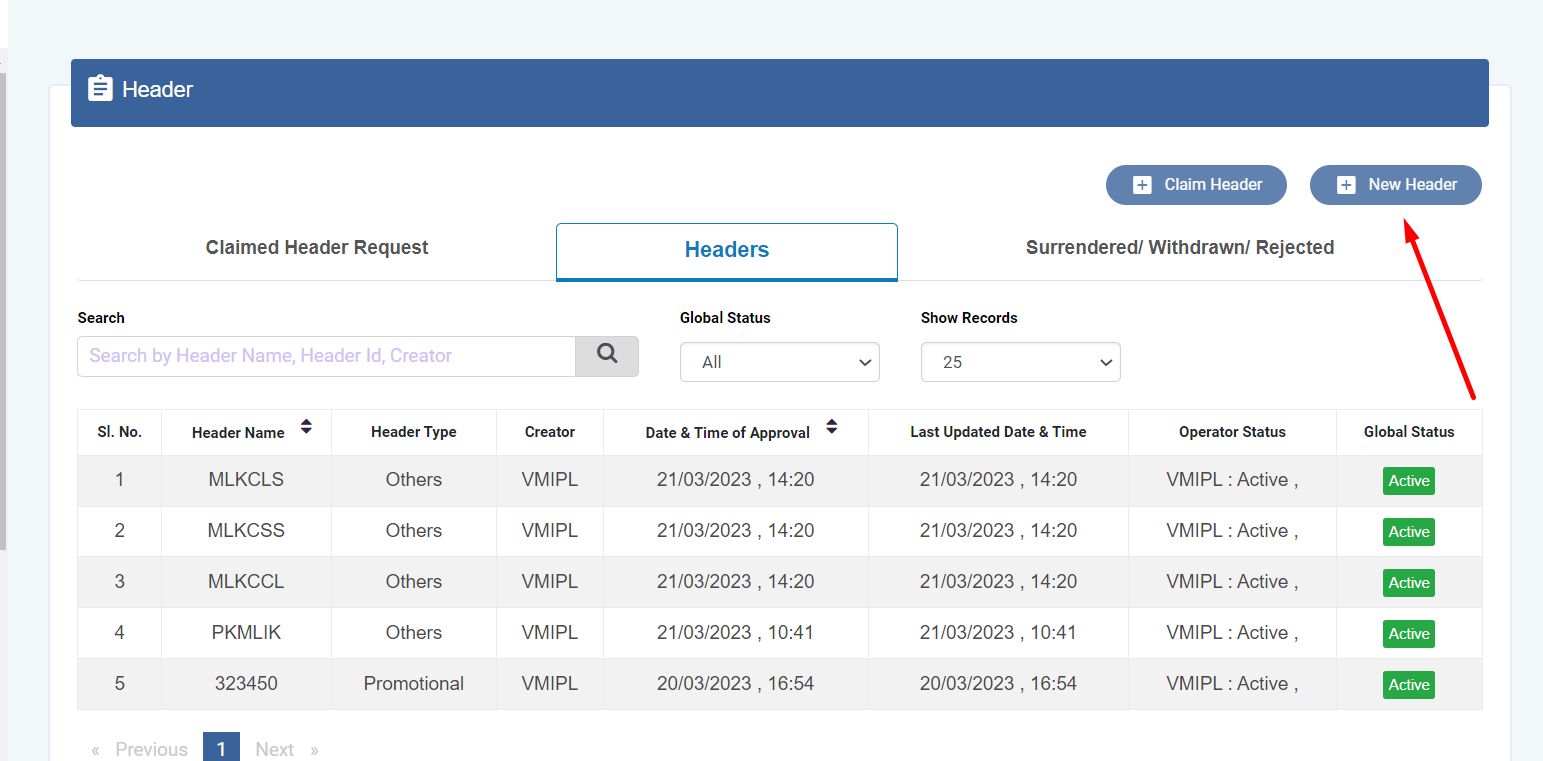
1. Click Header on left navigation barto see the
detailed view of all the Headers.
2. Click New Header to create Header(s)
request. User can create 20 Header request
in one go.

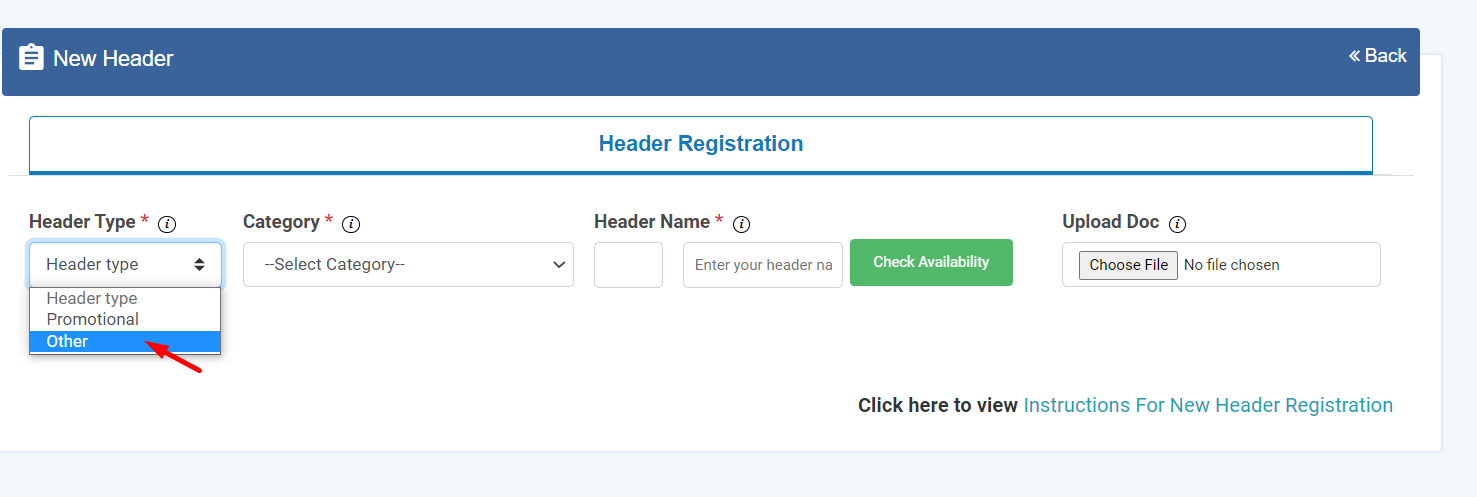
3. Click Header Type and choose the type of
Header from the list mentioned.
• Promotional
• Other
Header Type depends on the type of the commercial
communication message that need s to be sent with that
header. (Eg: Promotional for promotional messages and
for all other select the Other type)
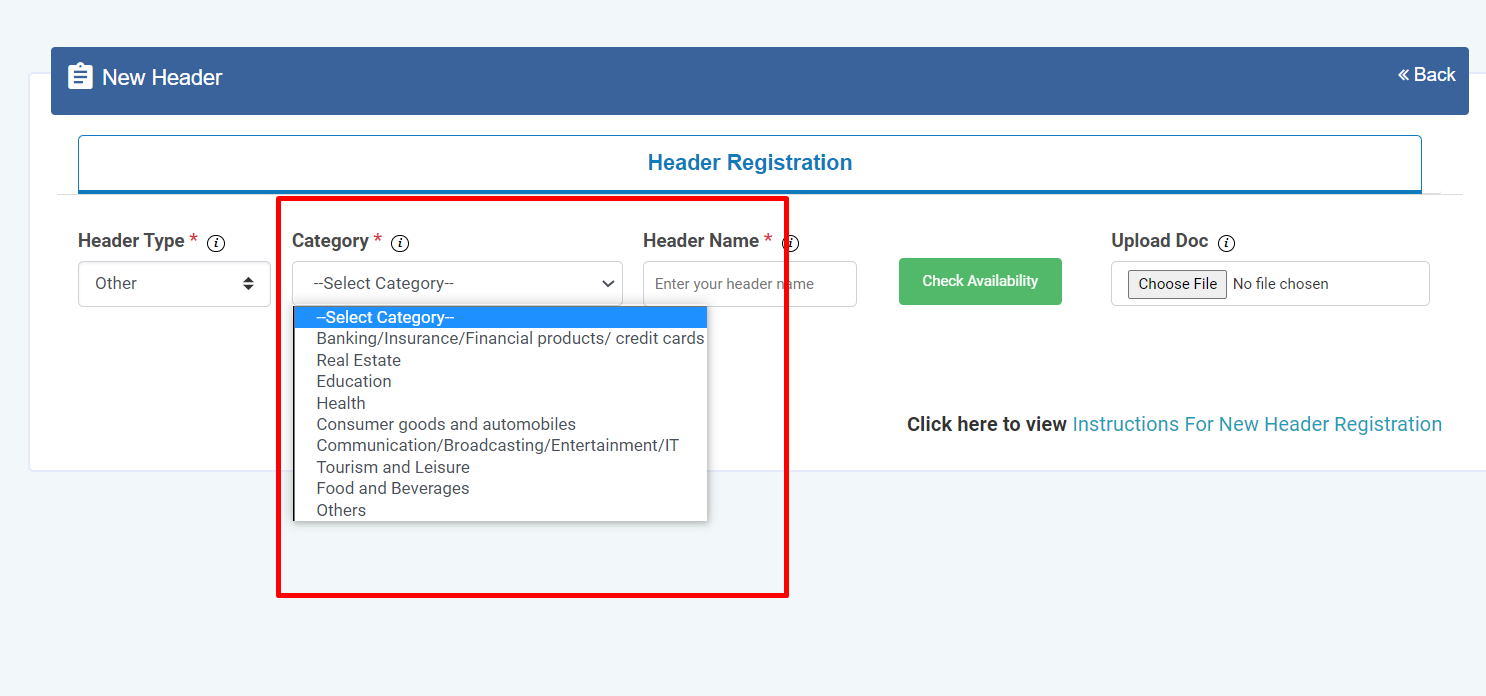
4. Select the Category from the dropdown as per 4
your business requirement.
There are 9 number of categories listed in the dropdown
list those entities who does not find their business can
choose “Other” in the category to create the header.
In case the Header Type is “Other” then category is
optional but for Promotional category is mandatory
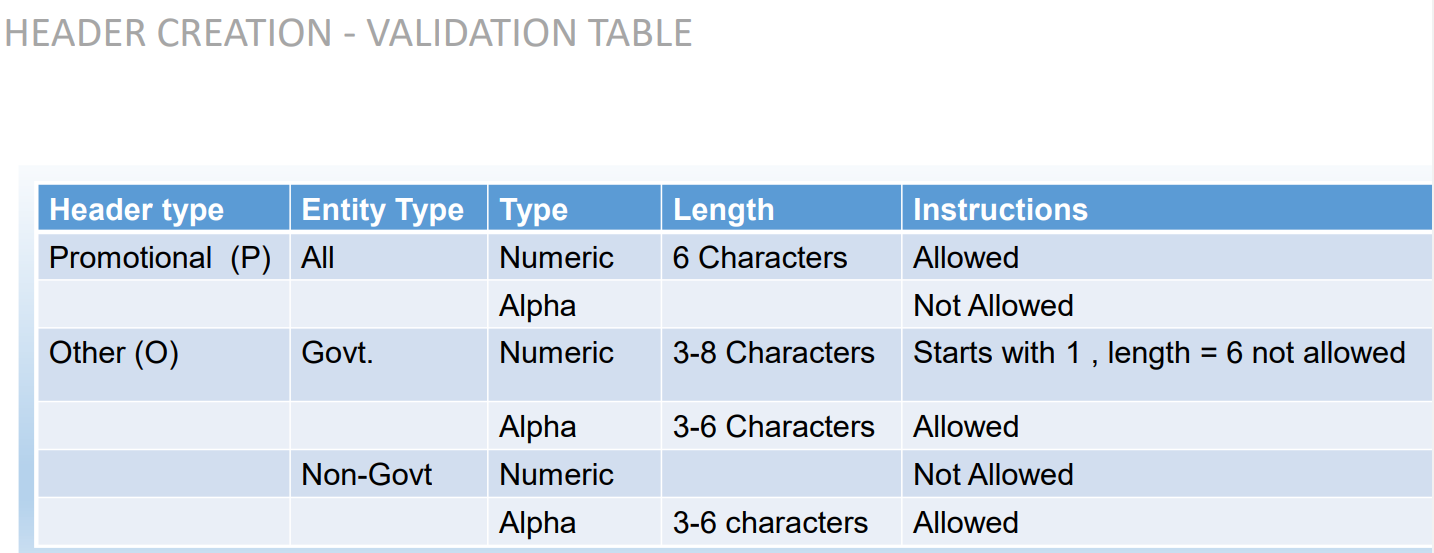
5. Type in the desired HeaderName according to
your Header Type/Brand Name or business
requirement.
Header Name will be decided by the Entity basis on
their business requirements and Entity name. (Eg:
Entity Name: HDFC BANK , Header Name: HDFCBK)
Refer Table 1 to understand the validations and
possible type of headers that can be created under
various categories for Govt and Non-Govt entities.
6. Click Check Availability to check the availability of
header name. If available proceed with next step.
If not available follow the claim process.
7. Upload relevant document related to header by
clicking on Choose File button.
8. Click on Add More Header button to add more
header request. User can create up to 20 header
request at a time.
9. Click on Submit button to submit the header
request.
10. An OTP box will appear.
11. Click on the Get OTP button. Instantly an One
Time Password (OTP) will be send to the
registered Mobile and Email Id. Type the OTP in
the given box
12. Click on the Submit button. On successful
submission of request a message will appear on
the top of the screen.
13. Once you submit the header request it would  show in the header section with status as Pending.
Once the Operator approves the header
the status will change to Active.
Templates are created for Commercial Communication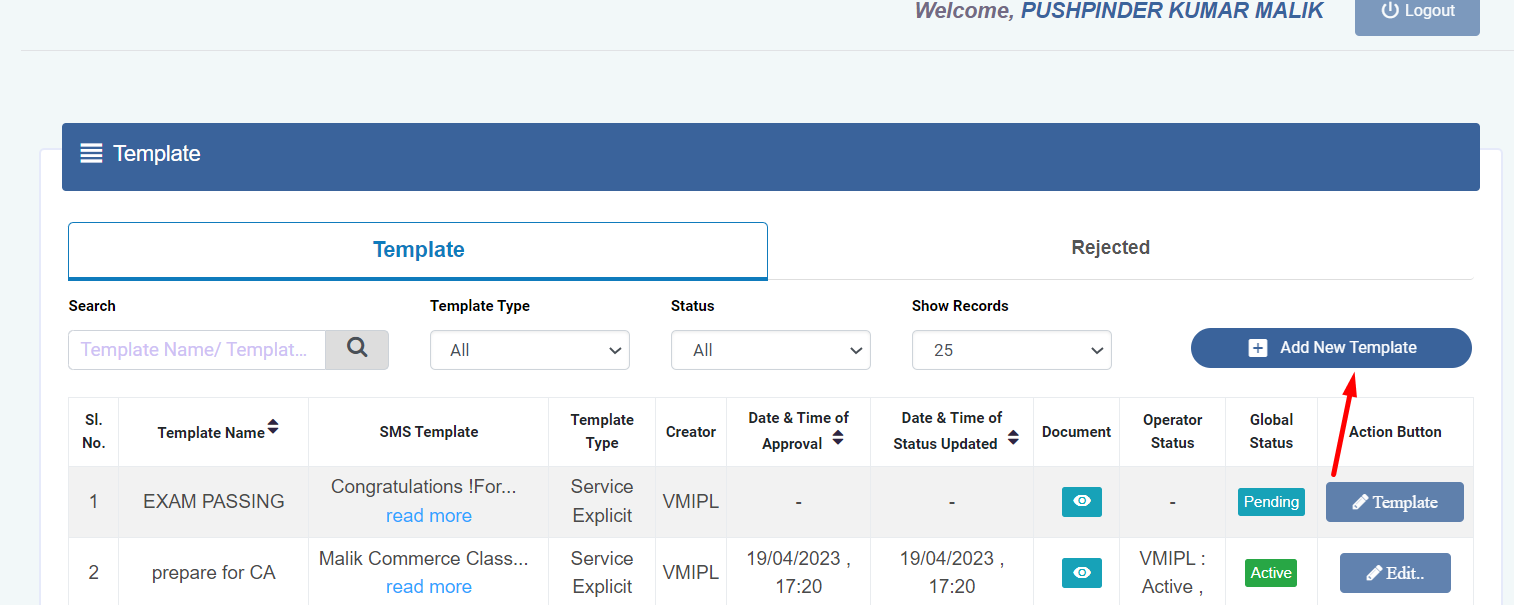
and as per TRAI guidelines all the Principle Entities
needs to register their Templates before sending
Commercial Communication.
1. In the Entity portal on the side bar click on the
Templates option to view the page.
2. In the Template page click on Add New
Template button to create new Templates.
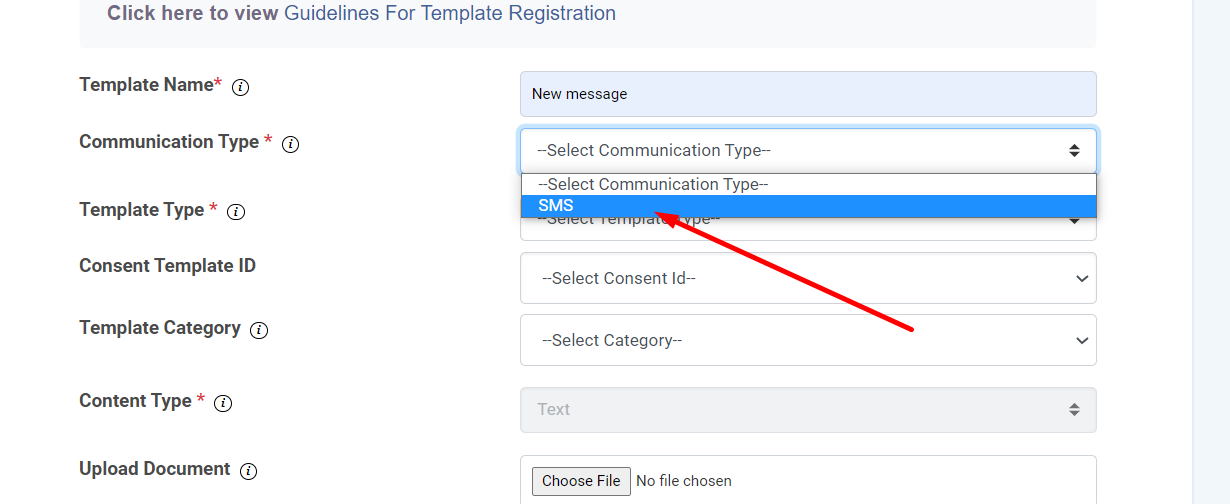
3.In the Communication Type column select the
type of communication from the following:
• SMS
• Call
Note: Currently SMS is only available for selection.
4. Choose your template type then select template category
 \
\
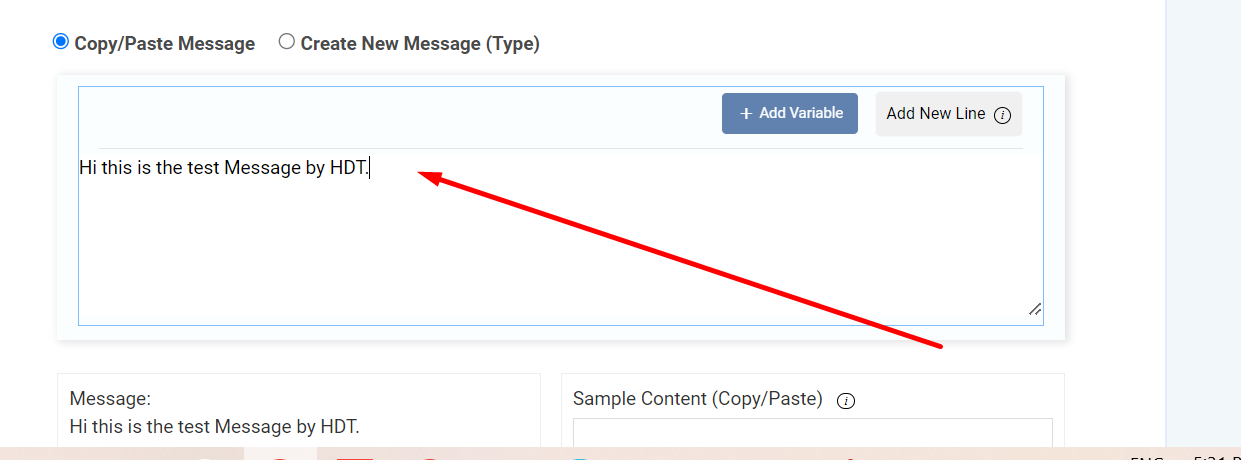
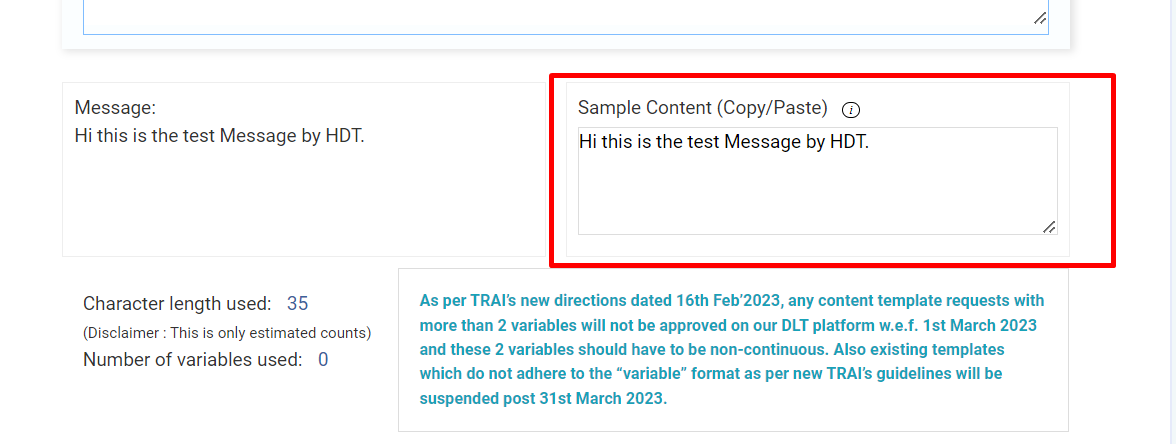

5. In the header associated section click on select all option (which the client already approved from the dlt panel)
6. After that you can copy your sms content and paste in the copy paste section which is given below or write your own message
7. Copied content can also viewed in the sample content option.
8. Click on the submit button
Call Recording Live Reports DTMF Multi-level IVR Repeat Targeting API & Webhook Integration


Call Recording Live Reports DTMF Multi-level IVR Repeat Targeting API & Webhook Integration


Call Recording Live Reports DTMF Multi-level IVR Repeat Targeting API & Webhook Integration


Incredible Features To Run Successful IVR Campaigns





BULK SMS PLANS CONNECTING YOU TO THE WORLD.
These figures don't tell the whole story,We add value to your business in more than one way
25+ Billions
SMS Processes Annually
500+
Direct Mobile Operator Connections
50000+
Customers & Resellers Accessible Worldwide
200+
Countries Coverd